Showing posts with label main dishes. Show all posts

Sunday, July 17, 2011

Acorn Squash With Sausage Stuffing

Bowls you can eat are always more fun than bowls you can't
I know what you're thinking. "Isn't acorn squash more of an autumn dish?" Well, let me tell you something - I'm a rebel. I don't let myself be constrained by the seasons. Strawberries in winter? Apples in the spring? Acorn squash in July? You bet. Someone, somewhere, is growing everything all the time. I know that eating local is all the rage these days, and it's a movement that I generally support, but I'm not going to let the fact that my acorn squash was grown in another hemisphere deter me from enjoying it.

Besides, I had some italian sausage that I needed to use, and I haven't done a sausage stuffing in a while. You could certainly use something else to hold the stuffing, but acorn squash has always been my favorite vehicle for this.

Nutritionally, acorn squash is similar to sweet potatoes. It's got carbohydrates, but it's not going to send you spiraling into a sugar coma. Eating the squash along with the sausage stuffing helps, because the protein, fat, and fiber in the stuffing will cause you to absorb the carbohydrates more slowly.


This is one of those times when the ingredients have started hanging off the cutting board.
It always makes me worry that the recipe is too complicated.


Ingredients

2 acorn squash
1 carrot
2 stalks celery
1 small onion
2 cups mushrooms
1 lb italian sausage
1/2 cup pecans
2 cups cauliflower rice
1 egg
salt and pepper to taste


Equipment

Baking Sheet
Aluminum Foil (recommended)
Pan
Large Bowl


Preheat your oven to 350.

Cut each acorn squash in half from stem to tip, and scoop the seeds from the middle.

People tell me you can clean the seeds and roast them for a snack. People tell me a lot of crazy stuff.


Place the halves cut side up on a baking sheet covered with aluminum foil. Bake them for 30 minutes while you prepare the stuffing.

Pre-baking them makes sure that they get tender without burning the stuffing.


Chop the carrot, celery, and onion. You should aim to have roughly quarter inch cubes of each.

Fancy French cooking term for this: mirepoix


Cut the mushrooms into small pieces (just a little larger than the carrot, celery, and onion)

I used cremini mushrooms, but white button mushrooms are fine.


Place a pan over medium-high heat and add the sausage to it. If your sausage is in casings, remove it from the casings before adding it to the pan. Break up the sausage as it cooks.

I used mild italian sausage this time, but I think the hot kind is better.


When the sausage is browned, move it to a large bowl. Add the carrot, celery, and onion to the pan. Cook them until the celery and onion become translucent. (About five minutes)

You should be "sweating" the vegetables. That means if you see the onion start to turn brown, you need to lower the heat.


When the vegetables are done, move them to the bowl with the sausage. Add the mushrooms to the pan and cook them for about five minutes, until they are soft and browned slightly. Move them to the bowl. Also add the cauliflower rice and pecans to the bowl.

In my old age, I forgot to take a picture of the mushrooms cooking,
so here's a picture of everything in the bowl instead.


Allow the contents of the bowl to cool for about two minutes. Then, scramble the egg in a small bowl and add it to the large bowl with the other ingredients. Add a little salt and pepper, and mix everything together.

When they have cooked for 30 minutes, remove the acorn squash from the oven and add the stuffing to the middle of each half. Lightly pack the stuffing in as you add it, and mound it above the top of the squash.

Turn your oven up to 425 and bake the stuffed squashes for 15-20 minutes. When they are done, you should be able to insert the tip of a knife into the meat of the squash with very little resistance.

The top of the stuffing will brown a little.


Notes
  • If you use the quantities in this recipe, you may be able to stuff three squashes instead of two. It kind of depends on the size of the squash and how high you mound the stuffing.
  • Using aluminum foil on the baking sheet isn't strictly necessary, but it makes cleaning up a lot easier.
  • I'd recommend using hot italian sausage for this recipe if you can. The mild kind is fine, but I think the hot kind would make things a little better.
  • If your halves won't sit with their cut sides upright, you can use a little aluminum foil to prop them up. Just make little aluminum foil donuts and sit the halves in the middle of them.

Wednesday, June 29, 2011

Jerk Chicken

Like BBQ, jerk chicken is one of those dishes that has
a thousand different recipes, each one claiming to be
THE authentic way of doing it.
For our honeymoon, Miriam and I went to Jamaica, where we stayed at a resort and basically made no effort to experience Jamaica's culture. To be fair, "Jamaica's culture" didn't have swim-up bars and all the pina coladas you could drink, whereas the resort did. This was well before our paleo diet days, so we ate a lot of junk, but one thing we ate that actually fits very easily into the paleo diet was jerk chicken. I'm not saying it did anything to offset the three pina coladas I usually drank along with it, but in and of itself, it's pretty good for you.

Jerk chicken is just chicken marinated in a particular kind of marinade, and then grilled. While I was researching this recipe, I stumbled across a website run by a Jamaican cultural center that claimed that the most authentic way to cook jerk chicken was over a fire made with "pimento wood." Pimento is what Jamaicans call allspice, so the site was saying that If I had any wood from an allspice tree, I should use that. I don't have any allspice wood, so I used charcoal. I do recommend that you make this chicken with the smokiest cooking method you can manage. Charcoal grilling is probably the best option, followed closely by grilling with propane.


There are a lot of ingredients in this recipe, but the food processor does most of the work for you.

Ingredients

6 green onions
6 cloves garlic
2 small onions
3 habanero chiles
4 tsp salt
4 tsp thyme
4 tsp allspice
2 tsp black pepper
2 tsp nutmeg
2 tsp cinnamon
1 tsp ginger
4 tbsp apple cider vinegar
1/2 cup lime juice
1/4 cup tbsp olive oil
Approximately 3.5 lbs of chicken (Roughly one chicken cut into pieces)


Equipment

Food Processor (recommended)
Large Zip-top Bag (recommended)
Grill (recommended)


Remove the white bulb end of the green onions and discard them. Cut the green onions in half and place them in the food processor. Remove the paper from the garlic, and place the whole cloves in the food processor with the green onions. Remove the outer layer of the 2 small onions and cut off their root ends. Cut each onion into four pieces and put them in the food processor. Carefully remove the stems and seeds from the habanero peppers and discard them. Place the peppers in the food processor with the other vegetables.

Try not to handle the pepper seeds very much.
If you do handle them, don't touch your eyes for about a day.


Pulse the vegetables several times in the food processor until they are roughly chopped. Add the salt, thyme, allspice, black pepper, nutmeg, cinnamon, and ginger to the food processor.

The newer your spices are, the more flavor they have.
This might be a good time to replace that container of allspice that you bought back in college.


Pulse the vegetables and spices a few times to combine them.

You might need to scrape down the sides of the food processor if everything keeps trying to climb out.


Add the vinegar, lime juice, and olive oil to the food processor, and turn it on for about 15 seconds, until the marinade is a smooth, loose paste.

Not the kind of paste you used to eat in kindergarten.


Place the chicken and two-thirds of the marinade into a large zip-top bag. Close the bag and get as much air out of it as you can. Make sure that the chicken is evenly covered with the marinade, and place the bag in the refrigerator for several hours (overnight is even better). Save the remaining third of the marinade for use while grilling.

Plastic bags are the best container for marinating, because they hold the marinade right next to the food.


Grill the chicken using indirect high heat for about 30 minutes. Leave the lid of the grill closed as much as possible to promote smoking. Turn the pieces several times, and use the marinade that you set aside to baste them as they grill.

You should try to arrange the pieces so that the smaller ones are on the cooler parts of the grill.
Otherwise, they may dry out before the larger pieces finish cooking.


When the chicken has finished cooking, allow it to rest for about five minutes before serving.


Notes
  • You may have noticed the three habanero chiles in this recipe. I won't deny that this chicken is spicy, but it's not as spicy as the three habaneros would make you think. Removing their seeds really removes a lot of the heat, and they're distributed across a whole chicken.
  • If you're still worried that this will be too spicy, you can substitute jalapeno peppers for the habaneros. I wouldn't leave the peppers out entirely, though. I think the chicken wouldn't turn out very well with absolutely no spice.
  • If you don't have a grill, you can bake the chicken in your oven. I would recommend doing it at 350 for about 25 minutes, and then increasing the heat to 450 for 5-10 minutes to sear the outside a little.
  • If you don't have a food processor, you could make the marinade in a blender. To do that, you should put all of the liquids in the blender first, and chop the vegetables finely before putting them in. Set your blender to its highest setting, and it should work pretty well.
  • The best way to create "indirect high heat" on a charcoal grill is to pile the charcoal in the middle and then place the chicken in a circle around the outside. On a propane grill, light all the burners but one, and place the chicken over the unlit burner.

Thursday, June 23, 2011

Chicken Cacciatore

The scientific name for the tomato is Lycopersicon esculentum,
which means "wolf peach."
"Cacciatore" is Italian for "hunter," so chicken cacciatore is "hunter's" chicken. I'm not really sure if the idea was that hunters would make the dish while they were out hunting, or if their wives were supposed to have the dish ready when they came home. Either way, it's a pretty solid meal to have if you've been tramping through the woods after an animal all day. One source I found suggested that chicken cacciatore comes originally from renaissance Italy, but I find that hard to believe, given that a lot of Europeans thought tomatoes were poisonous at the time. If the original really was a renaissance dish, I suspect that the ingredient list was drastically different.

Regardless, modern chicken cacciatore has many variations in both ingredients and technique. Chicken is a constant, and tomatoes are pretty standard, but the supporting vegetables and herbs are all over the place. I needed to make a dish for a potluck dinner, so I came up with a recipe that fit my needs. First, it's easy. It's made in a crock pot out of ingredients that need very little preparation. Second, it makes a lot at once. This recipe was easily 8-10 servings. You could cut it in half without too much trouble if you're not making it for a group.


Canned tomato products are a lifesaver for any dish that you're going to cook a long time.

Ingredients

1 medium onion
1 green bell pepper
4 cloves of garlic
12 boneless, skinless chicken thighs
1 8oz. package of sliced mushrooms
2 tbsp dried Italian herb blend
1 tsp salt
2 6oz. cans of tomato paste
1 14oz can of diced tomatoes


Equipment

Crock Pot
Medium Bowl

Start by chopping the onion into large pieces. Remove the stem and seeds from the bell pepper and chop it into large pieces as well. The pieces should be about the size of your fingertip.


Do not include any actual fingertips in the dish.

Finely mince the garlic cloves.


The finer you mince garlic, the more flavor it adds to a dish, so go nuts.

Cut each chicken thigh in half, and remove any large pieces of fat or skin that may still be on the meat.


You don't have to worry about removing smaller pieces of fat from the chicken.
Just try to get rid of any chunks of fat that have their own zip code.

Add the chicken, onion, pepper, garlic, and mushrooms to the crock pot. Also sprinkle 2 tbsp of dried Italian herbs and 1 tsp of salt on top of the meat and vegetables.

Before you add them, check your mushrooms just to make sure they don't have any dirt on them.


In a medium sized bowl, combine the diced tomatoes (with their liquid) and the tomato paste. Stir them together so that they form a thick sauce.


"Sauce" might be a little generous at this point, but this stuff will really improve while the dish cooks.

Add the tomato sauce to the crock pot. Try to evenly distribute the sauce across the top of the chicken and vegetables.


The juices from the other ingredients will mix with the sauce, thin it out, and make it delicious.

Cook everything in the crock pot on low for about 8 hours. When it's done cooking, gently stir everything to even out the sauce.


I put mine in a casserole dish for transport to the potluck.
Big mistake - it was too full and I got sauce everywhere.

Notes
  • A lot of recipes for chicken cacciatore want you to brown the chicken in olive oil before braising it. I think that's a waste of time when making it in the crock pot, because any browning gets basically dissolved over the extremely long cooking.
  • I used some cremini mushrooms for this dish, but regular white button mushrooms work just fine. You could also change things up with some more exotic types if you wanted.
  • You can use other pieces of the chicken in this recipe, but I find that boneless, skinless chicken thighs are generally the best performers in the crock pot. White meat dries out too much, and I think drumsticks have too much connective tissue.
  • I went with some packaged items in this recipe because I needed something I could throw together before work without a lot of hassle. You could certainly use fresh tomatoes instead of the canned diced tomatoes, and you don't have to buy your mushrooms pre-sliced. If you want to use fresh herbs, go for it. I'm pretty sure that Italian herb blends are mainly oregano and basil, with maybe a little thyme thrown in.
  • If your sauce is really watery after you stir everything up, you can try adding about a tablespoon of arrowroot powder to thicken it up. Sprinkle it on top (to help avoid clumps) and then stir it in very gently. Let everything cook on low for another 15 minutes, and the sauce should get thicker.

Tuesday, June 21, 2011

Koobideh Kabobs (AKA Ricky Channels His Inner MacGuyver)

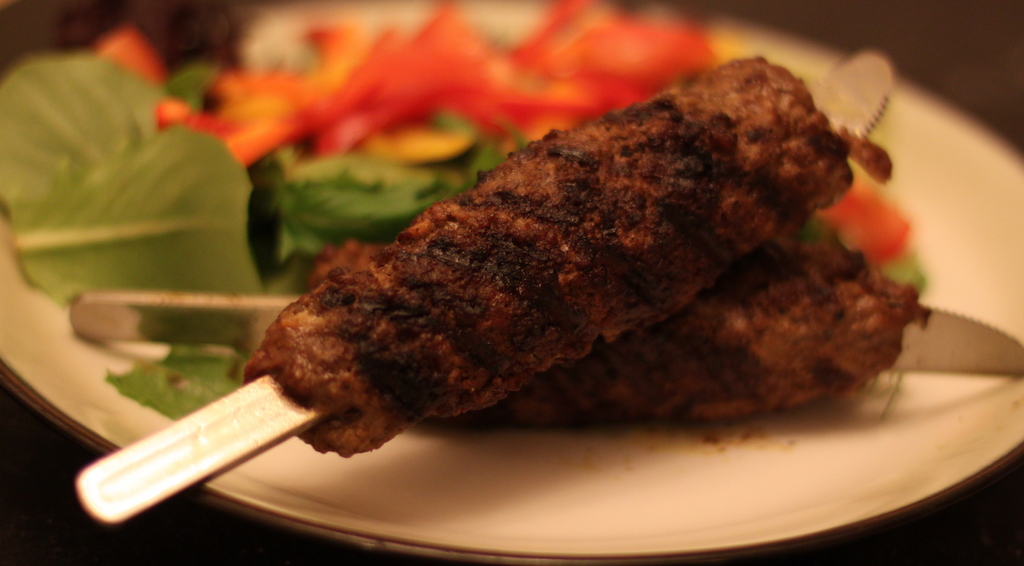
Lets just acknowledge that some foods are more photogenic
than others and move on with our lives, OK?
You've probably made kabobs before. They're really easy to make, and just about everyone likes them. You stick some chunks of meat and vegetables on a few sticks and throw them on the grill, and you're done. Most restaurants that serve kabobs also have a type that you probably haven't made, though. They're called "koobideh" (along with about fifteen other slight spelling variations.) Koobideh are made from ground meat and spices wrapped around a skewer and grilled in the same way as other kabobs.

They're already paleo without making any adjustments, and they're also a good way for me to curb my never-ending craving for steak without setting off Miriam's "steak, again?!!" alarm bells. Since the recipe is really simple, I thought I'd take the opportunity to grind my own meat. If you don't have a meat grinder, you can just use hamburger from the store, but sometimes I like to get crazy with the kitchen tools.

Also, you may have noticed in the picture that I didn't wrap the koobideh around regular skewers. There's a very good reason for that. Most standard skewers aren't really wide enough to handle koobideh very well. As the meat cooks, it shrinks a little, and eventually a standard skewer will just spin inside the meat without letting you turn the kabob. If you, like me, don't have a set of super wide skewers, you've got a couple of options. You could use popsicle sticks. You could also use those bamboo chopsticks that come connected to each other (don't separate them). If you use either of those, make sure to soak them in water for a while before putting them on the grill. I decided to use some of the cheap butter knives that I've got hanging around my kitchen. They're about the right length, and they're wide and flat, so they help turn the meat even after it's cooked.


Skewer vs. butter knife. Notice how much wider the knife is.


That beef actually is grass-fed and organic. It cost about a million dollars.

Ingredients

1 to 1 1/4 lbs hamburger (I ground my own, you can use pre-ground if you want.)
1 tbs minced onion flakes
1/2 tsp salt
1/2 tsp pepper
1/2 tsp garlic powder
1 tsp turmeric


Equipment

Meat Grinder (If you're grinding the meat yourself)
Large Bowl
Wide Skewers (or an appropriate substitute)
Grill or Grill Pan


If you're grinding the meat yourself, you need to cut it into 1 to 2 inch cubes so that it will fit into the grinder. Leave the fat on the meat; it will help make the kabobs juicier.


The size isn't really important. You just need to get it small enough to shove into the grinder.

Add the onion flakes, salt, pepper, garlic powder, and turmeric to the meat before grinding it.


Adding the spices now is the easiest way to get them mixed into the meat.
The grinder does all the work for you.

Add the meat to your grinder and follow it's instructions to grind the meat. (With mine, I turn it on and start slowly feeding the meat into it, then the hamburger comes out the other end. Yours probably works similarly)


Put the meat in along with all its spices...
and seasoned hamburger comes out the other end.

If you've been grinding your own, your hamburger should now be seasoned and sitting in a large bowl. If you bought your hamburger pre-ground, you should put it into a large bowl with all of the spices and use your hands to mix everything together.


Make sure that the spices are evenly distributed through the meat.

Now, use your hands to form the hamburger into tubes around your skewers. You'll need to pack the meat pretty tight to make it stay put. Depending on exactly how much hamburger you used and the size of your skewers, you'll get anywhere from four to six kabobs. Set your kabobs in a dish that you can cover and put in the fridge for about an hour. This will let the fat in the meat firm up a little, and will also help hydrate the onion and garlic.


They're basically meatloaf-on-a-stick.

After refrigerating, put the kabobs onto a hot grill or grill pan. Cook them on their first side for two minutes, and then roll them one quarter turn. Repeat for all four sides. Then, reduce the heat to medium and cook each of the four sides for one additional minute. When you're done, you will have cooked the kabobs for twelve minutes in total.


The grill pan gets used a lot because it's easier to photograph.
Given a choice, I actually prefer a regular grill.

Remove the kabobs from the heat and let them rest for a few minutes before serving.


My trusty draining rig makes its one-thousandth appearance.

Notes
  • Whether you grind your own hamburger or not, you need to have some fat in the meat. An 80/20 blend of hamburger is a good bet. For grinding your own, go with chuck.
  • You don't have to stick to beef for this. Lamb or chicken are also popular choices for koobideh. Although it's not traditional, there's no reason pork wouldn't also work.
  • I've seen some recipes for koobideh that include an egg. It's in there to help hold the meat together, but I don't think it's necessary if you've got hamburger with a decent amount of fat. If you make this with chicken, you might want to add the egg.
  • My butter knives have really flat handles, so they're a good substitute for wide skewers, If your knives have really thick handles, they may not work as well.

Friday, June 17, 2011

Strawberry Pulled Pork

Pulled pork with strawberry barbecue sauce.
Sounds weird, right?
It turns out to be a really good combination.
I was looking through some of my favorite food blogs the other day, and a weird recipe caught my eye. It was over at Stuff I Make My Husband, and it was a recipe for Strawberry Pulled Pork. I've already posted a more traditional recipe for Barbecue Pulled Pork Shoulder, but the idea of using strawberries in a recipe like this was too intriguing not to try. I figured if it turned out to be gross, I could just forget about it, and if it turned out to be good, I'd have an interesting recipe for the blog. Luckily, it turned out to be really good, so I'm sharing it with you.

I changed the original recipe a little. I left out the molasses and the rosemary, changed the ketchup to tomato paste, and added a little cayenne pepper. The rest is pretty much the same, though.

The sauce that this recipe makes is really good. Better yet, I added absolutely no sugar to it beyond what's naturally in the ingredients. Because of that, you can feel free to use a generous amount of sauce on the pulled pork without stepping into indulgence-land. Just remember that it's not a beverage and you'll be fine.


I usually get whole pork shoulders, but all I could find this time was a pre-trimmed one.
Either kind will work fine for this recipe.

Ingredients

1 pork shoulder
1 6oz can of tomato paste
1/4 cup apple cider vinegar
1/4 cup yellow mustard
16 oz strawberries (I used frozen, but fresh is fine too)
4 cloves garlic
1 tsp hot sauce
1 tsp smoked paprika
1 tsp cayenne pepper
salt and pepper to taste


Equipment

Crockpot
Sauce Pot
Strainer
Gravy Separator (Recommended)
Large Bowl (Recommended)


Crockpot recipes are always simple. This one is no exception. Just put everything into the crockpot and turn it on low for 8-10 hours. Try and get the spices primarily on the meat instead of around the sides of the crockpot, but even that is more of a guideline than a rule. Use several heavy pinches of salt, and a similar amount of pepper.


It's a good thing we'll be making a sauce, or this would be the dullest post ever.

After the pork has cooked in the crockpot, remove it and place it in a large bowl. Use two forks to shred the meat. Remove any bones or large pieces of fat if you see them.


You will eat some as you shred it. It's OK. I know you can't help it. I do the same thing.

You need to strain the liquid in the crockpot to remove all the large, solid bits. You can use a strainer directly over your sauce pot, but if you've got a gravy separator, I would recommend straining the liquid into that first. That will let you remove some of the fat and will make your sauce a little smoother. Whether you use the separator or not, you need to put all of the liquid into a sauce pot, without any of the solids.


Solids would make a very chunky sauce. We're not going for chunky.

To make the sauce, you need to reduce the liquid by at least half, and by two-thirds if possible. It took me about 25 minutes of reducing over high heat to get the sauce to the right consistency. Your time will vary depending on the size and shape of your sauce pot. It's ready when the sauce has thickened and the bubbles start to stack up on each other in the pot.


You can see the bubbles stacking up in this picture.

Once the sauce has thickened, taste it to see if it needs any extra salt. Mine needed a few extra pinches. Remove the sauce from the heat and let it cool. You can put it into a condiment bottle if you have one. That will make it easier to serve.

To serve, put some of the meat on a plate and top it with the sauce. (Of course, if you couldn't figure that out on your own, chances are you're having trouble just reading this)

Notes
  • This will make a lot of pulled pork. It's a good party recipe, or you can freeze some of it. The sauce can be frozen too.
  • I bought a couple of those plastic bottles that burger joints put ketchup in. They cost me less than a dollar apiece, and they're really useful for storing sauces.
  • Reducing and boiling are the exact same thing. Just don't try to reduce a sauce with the top on the pot. All the evaporated liquid will just condense and run back in.
  • Eight hours is the minimum for this recipe. I really recommend at least ten, and if you've got time, go for twelve. The meat will be more tender, and the strawberries will break down more, making the sauce better.
  • To tell if your sauce is thick enough, you can dip a spoon into it and hold it up sideways. If the sauce just runs right back off of the spoon, you need to keep reducing. If it does a pretty good job of hanging on, you're at least close to the right consistency.
  • Be careful when reducing the sauce. It's possible to burn it near the end, when a lot of the liquid is gone. Just keep an eye on it and stir it occasionally.

Tuesday, June 14, 2011

Mango Salad With Chili-Lime Shrimp (AKA The Triple Threat Post)


I'm told that bright colors are important when composing a dish.
I couldn't really say, because my food generally disappears
before I get a good look at it.
This is sort of a three-in-one recipe. The three parts add up to a great salad, but on their own, they're great building blocks for other dishes. The chili-lime shrimp could be served on their own as a main course, or tossed with some spaghetti squash and a few spices to make a good paleo pasta dish. The mango salad without any meat on it would make a great side salad that you could serve as the first course in a fancy dinner. It would also pair up very well with other kinds of meat - chicken or crab would be excellent choices. The salad dressing is my all purpose vinaigrette. I've put it on every salad I've made for about the past year, and it's worked with every single one.

Nutritionally, I'd not only say that you can eat this every day, I'd encourage it. As far as I know, there isn't a diet in existence that wouldn't heartily endorse this dish. It's got plenty of protein from the shrimp. It's pretty low carb, and those carbs come primarily from fruits and vegetables. It's got some healthy fats from the olive oil, but not enough overall fat to make the fat-phobics twitch. You just can't go wrong.


Ingredients

Peeling and de-veining shrimp is a task so tedious it could be used in psychological warfare.
I spend the extra few cents and let someone else do it.


For the Shrimp
1 lb shrimp, peeled and de-veined
1 lime
1/2 tsp salt
1 tsp garlic powder
1/2 tsp cayenne pepper
2 tsp smoked paprika
1/4 tsp pepper


I bought my mango peeled and seeded.
Peeling and seeding a mango isn't as tedious as de-veining shrimp, but it is more dangerous,
so the two tasks come out even in my mind.


For the Salad
1 mango, peeled and seeded
2 small tomatoes
3 baby bell peppers (or 1 normal bell pepper, red or orange recommended)
1/4 cup cilantro
6 cups salad greens of choice


I never get super fancy balsamic vinegar, because it tastes exactly the same as the cheap stuff to me.


For the Dressing
1/4 cup extra virgin olive oil
1/4 cup balsamic vinegar
1/2 tsp mustard
1/2 tsp hot sauce
1/4 tsp salt
1/4 tsp pepper


Equipment

Pan (for the shrimp)
Large Bowl (for the salad)
Empty Condiment Bottle (recommended for the dressing)


Make the shrimp ahead of time, if possible, so that they can cool down in the refrigerator before being added to the salad.

Start by removing the zest from the lime. I recommend using a fine cheese grater or a microplane grater. Just make sure to get as little of the white part of the skin (the pith) as possible. Once you've removed the zest, juice the lime and save the juice for a later step.


Interestingly, the zest of a lime will make a dish taste more like lime than the entire pulp of the lime will.

Next, combine the salt, garlic powder, cayenne pepper, smoked paprika, pepper, and lime zest. Mix them thoroughly.


It's easiest to combine the spices if you put them into a container with a top and just shake them up.

Toss the shrimp with the spices. Try to evenly coat the shrimp.


If your shrimp were particularly wet, it might be best to pat them dry with a paper towel before adding the spices.

Add a little of your favorite oil (I used coconut oil) to a frying pan over medium heat. When the pan gets hot, add the shrimp and cook them for about 1 minute. Add the lime juice to the pan, and turn the shrimp over. cook for another 1-2 minutes, until the meat of the shrimp is white.


Shrimp cook fast. Once the meat turns white, remove them from the pan immediately, or suffer shrimp jerky.

Remove the shrimp from the pan and put them into a container that can be refrigerated. Refrigerate the shrimp for about an hour, so that they are cold when they are added to the salad.


By "a container that can be refrigerated," I mean
"a container with a top that will keep your whole fridge from smelling like shrimp."

The salad is easy to prepare. It's basically a lot of chopping. You need to chop the mango and the tomatoes into half-inch pieces. Remove the seeds and stems from the peppers, and chop them into quarter-inch pieces. The cilantro should be chopped finely.


Do this.

Once everything is chopped, either add the salad greens, mango, tomatoes, peppers, and cilantro to a large bowl and combine them, or place the greens onto your serving plates and top them with the other items.

The dressing is even easier than the salad. Just combine the olive oil, vinegar, mustard, hot sauce, salt, and pepper and mix them well. I recommend adding them all to an empty condiment bottle (I used an old hot sauce bottle) and shaking them vigorously, but you could also whisk them together in a bowl if you don't have a bottle.


Choose your bottle wisely. Some bottles say "high class," others say "white trash."

To serve the dish, put the salad on a plate and top it with a little of the dressing. Then put the shrimp on top. I recommend putting the shrimp on after the dressing because they look prettier if they don't have brown blotches on top of them, but it's your choice.

Notes
  • I used frozen shrimp that I defrosted. If you do the same, make sure you're buying frozen raw shrimp, not frozen cooked shrimp. Also, a dirty secret of the grocery store - unless you live in sight of the water, the shrimp that you think are fresh at the fish counter are probably previously frozen anyway.
  • Shrimp are sold in different sizes. I used size U15 shrimp, which are pretty big. You don't have to use shrimp that big, but I wouldn't recommend using really tiny shrimp.
  • I bought my mango pre-peeled and pre-seeded because I hate seeding and peeling mangoes. They're hard to hold onto while slicing the fruit away from the seed. If you have to do it, here's the basic method. Use a vegetable peeler to cut the skin of the mango away. Stick a fork into the tip of the mango (the smaller end) to help you hold it upright while cutting it. Rest the bottom of the mango on a cutting board, holding the fork at the top end. Slice down the sides of the mango, staying as close to the seed as you can. (The seed of a mango is shaped like an almond). It's a pain.
  • I used some baby bell peppers that I found at Trader Joe's in the salad. You can use a regular red or orange bell pepper if you want. There won't be any difference.
  • When I make salads, I just buy some mixed greens. You can use whatever salad greens you like.
  • While there is (apparently) a difference between a four-dollar bottle of balsamic vinegar and a hundred-dollar bottle of balsamic vinegar, I maintain that the only difference between a four-dollar bottle and a twenty-dollar bottle is sixteen dollars.
  • I got two generous servings from this recipe. You could probably stretch it to three.